https://www.hairbowsuppliesetc.com/blogs/news.atomHairbow Supplies, Etc. - Blog2019-02-19T11:43:00-05:00Hairbow Supplies, Etc.https://www.hairbowsuppliesetc.com/blogs/news/how-to-make-rolled-felt-flowers-tutorial2019-02-19T11:43:00-05:002019-02-19T11:44:22-05:00How to Make Rolled Felt Flowers TutorialGwen Wichman
I am just the biggest fan of felt – if you can’t already tell! I think I’ve come up with a hundred ideas of DIY felt crafts that I could make (just kidding… but you know what I mean, right?) This rolled felt flower tutorial is another perfect no sew idea! I get so many people that tell me that they worry about their baby having a scratchy hair bow. Or a felt circle going on the bottom of their bow – was the felt scratchy or soft? Well, of course you’d want a soft felt! And on top of that, what would make a better hair accessory than a rolled felt flower? So, I played around with this felt, and here we have an adorable step-by-step DIY rolled felt flower for you to use! The coolest part of this DIY flower is that when you cut the flower, the bottom of it is a built in felt circle! It really worked out all the way around to be a nifty hair accessory! I have seen people make a group of different types of felt flowers and make it into a really pretty headband.
Well today – we’re just learning to make felt flowers for headbands or hair clips. All you need is the basics: Scissors, hot glue, pearl button, and a piece of felt. I got my felt for like 25 cents a piece. Imaging how cost effective to make a dozen flowers out of a 25 cent piece of felt! Being the bargain hunter that I am, I find this a great deal!
First off, cut your rectangular piece of felt into a 4 inch circle. I eyeballed it and just made it the best circle I could. Now, take your circle and start off at the top, and cut into your circle. What we’re going to do is spiral it. Cut up to the left and make your spiral about a 1 inch wide spiral. Continue cutting to the left around until just right before the end, and you’ll have about a 1 inch circle left. Leave that for later.
Next, start at the tiny tip and start rolling your felt around. When you start rolling your felt, you’ll notice that it will start making a rose shape, and that’s what you want. Keep rolling around.
The top part will make the rose top, and the bottom you’ll use that to hot glue the backing on. When you get to the end of rolling your felt, you’ll just hot glue the last circle part on the bottom and that will be your end. Then take your pearl and put a dab of hot glue in the center, and put your pearl button in the center. I love to cut to felt flowers by hand! ( If you wanted to add a little leaf, you could buy some green felt and make a leaf and glue that in there as well.) And that’s it!
So if you'd like to learn how to make another DIY felt craft, here's a Felt Bow Tie Bow Tutorial for you!
]]>
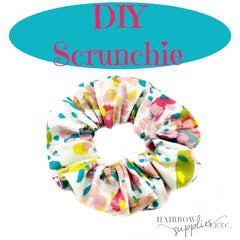
https://www.hairbowsuppliesetc.com/blogs/news/how-to-make-hair-scrunchies2019-02-17T09:17:00-05:002019-02-18T15:25:29-05:00How to Make Hair ScrunchiesGwen Wichman
Hair scrunchies are the most fun and versatile hair accessories! Remember having scrunchies and stacking as many as you could up your arm? I love that they are making a come back! Let me show you how to make scrunchies! We're going to make a hair scrunchie with elastic so get your supplies and let's get started! You'll need some fabric. I purchased my fabric at Hobby Lobby. I love how their fabrics are always so new and trendy! Then you'll need 1/4 inch skinny elastic, which you can purchase from my shop here. Get out your Safety Pins, Sewing machine (Sewing Machines Plus have the best sewing machines!), Thread, Scissors, and Pencil and you're on you're way!
First, take the long end of the fabric (the end that is 3 inches wide) and fold it down about 1/2 inch. Then you’ll take your whole fabric piece (the 22 inch long portion) and fold it right sides together. Then pin all the way down. I don’t always pin my fabrics together because I think it takes up too much time, but if you want to pin your fabrics together you can. Then stitch down a quarter inch seam all the way down. So you’ve just made a cute little tube. Now to get that tube right side in, you’ll need your safety pin.
Open up your safety pin and then open up your tube. Then safety pin one of the sides of your tube. Then put your safety pin through the tube and feed your pin all the way down. Once your pin has gone all the way down your tube, you can turn your fabric inside out very easily. Detach your safety pin from your fabric. Now get your elastic and attach your safety pin to it. Then run your safety pink through your tube. Make sure to keep track of the end of your elastic so it doesn’t get lost in the tube.
Next take your safety pin off and then tie a knot around your fingers with the elastic. Then slide your elastic knot back through the fabric so you can’t see it. Then tuck the unfinished fabric edge inside the other side of the fabric. Next you’ll take your sewing machine and sew right down the two edges to make a closed seam. And that’s it! It’s really so simple to make a scrunchie with elastic!
I made a few of these for my daughter and she just loves them! We had some leftover fabric and we made some mini scrunchies with it as well! She loves the big scrunchies the best! The fabric we used today goes with pink, turquoise, yellow, and lime so it would work with a bunch of coordinating outfits!
If you're interested in doing a no sew hair accessory for your next DIY project, check out my No Sew Pinwheel Hair Bow Tutorial. This is a fun project using ribbon, hot glue and scissors!
]]>
https://www.hairbowsuppliesetc.com/blogs/news/pink-diy-lace-baby-headband-tutorial2018-01-27T12:19:00-05:002019-02-18T15:39:21-05:00Pink DIY Lace Baby Headband TutorialGwen Wichman
I love babies and toddlers dressed up in pink lace and flowers. This cute Pink DIY Lace Headband is so easy to make and looks like you bought it at a boutique. It's just adorable and would look really beautiful to accent a Valentine's Day dress for your little girl.
This reminds me of when my daughter had her first photo shoot when she was a baby. There was the photographer, 3 moms (including me), and our 3 little girls. They were dressed to the 9s... hair curled, sweet smiles, just dolled up in their little outfits. The sun was shining through the trees. You know when it's really early in the morning and the rays of sun is coming through the trees!? Yes, well really early means chilly too. But the sun was just right for the photographer so it was the best time do it. The girls were freezing. And one of the girls was just gorgeous. But it's funny to see what happens behind the scenes of these photo shoots. The moms dancing around the girls, hopping and waving our hands in the background to do anything to make the girls smile. And the prettiest girl, who was the youngest, was just having a bad day and just did not want to smile. Poor mama had to work extra hard promising ice cream and candy, and whatever else to make her daughter smile. In the end the pictures were amazing. I can't imagine being a photographer every day. It's amazing what goes on behind the scenes to make those beautiful shots!
Where were we? Oh yeah! Let's make a pretty pink lace headband!
Gather the supplies you need which are all available in our shop here:
Take 1 of your felt circles and your largest flower. Put a little hot glue on the right edge of your felt circle and add the flower so it overlaps the edge, but doesn’t cover the whole circle.
Hold the flower’s petals out of the way and add more glue to another edge of the felt circle. Put your 2nd flower on the glue and snug it up against the 1st flower, while making sure to leave a little bit of the felt circle open.
Add more hot glue to the last edge of your felt circle and snug your 3rd flower up against the other 2.
Decide on the cutest spot for your rhinestone button and glue it in place. (I like to put mine where the 3 flowers come together.)
Flip your flower cluster over so the felt circle faces up. Take your 2nd felt circle and glue it so it overlaps the bottom of your largest flower and the 1st felt circle. (This makes your flower cluster stronger.)
Take your lace elastic and find the shiny side. Turn it shiny side down and glue one end onto the felt circle on your flower cluster. Use the tip of your scissors to press the lace elastic into the glue; this way you won’t burn your fingers.
Loop your elastic around, making sure it’s not twisted, and glue the other end slightly on top of the 1st Press this end down with the scissors tip.
Take your 3rd felt circle and glue it so it covers the lace elastic overlap. Now the back looks nice and finished!
That’s it! Your adorable baby Headband is ready to wear. You can mix things up with other colors of lace and flowers. Make one to match each of your little one’s outfits, or one for each holiday!
For another really cute project, check out the DIY scrunchies blog post to view how to make hair scrunchies..
]]>
https://www.hairbowsuppliesetc.com/blogs/news/flower-loop-hair-bow-tutorial2018-01-27T12:17:00-05:002019-02-18T12:33:28-05:00Flower Loop Hair Bow TutorialGwen Wichman
A friend asked me recently which hair bow style is one of my favorites, and I thought of this one, the Flower Loop Hair Bow. You can use ribbons that match your little girl’s favorite outfits, your sports team colors, or holiday colors! Let’s dive in and learn how to make this cute, versatile bow:
Gather all of your supplies which you could purchase in our store here:
Four pieces of 3/8 inch ribbon, 6 inches long (I use 2 Swiss dot and 2 solid)
Seal the ends of all your ribbons with the lighter. Thread your needle and tie a knot in the end.
Stack the four six inch ribbons together, with the dots facing up if you are using Swiss dot ribbon. Fold the stack in half, with the dots facing outward. Keep holding them folded. The fold marks the center of your ribbons.
Push your threaded needle up through the fold on your ribbons, but, do NOT pull it all the way through. Leave the ribbons stacked on the needle and fan them out so they sort of form a star.
Take the end of one of your ribbons, give it a half turn, and push it onto your needle. It should form a shape like the top of a breast cancer awareness ribbon. Repeat this step with the other ribbon ends, working around in a circle.
You’ll now have a pretty circle of loops that looks like a flower. Arrange them so they are evenly spaced, then pull your needle and thread all the way through so the knot at the end of your thread is snugged up against the back of your flower bow. Stitch through the center a couple more times to hold the loops in place, and tie off the thread on the back. Cut the thread and set this part of your bow aside.
Tie a new knot at the end of your thread, then repeat all of the above steps with your 7 inch ribbons.
Lay the flower bow made from the 7 inch ribbons face up. Decide how you want your bow made from the 6 inch ribbons to sit inside the larger bow. (Once you get the glue on, it won’t move!) Put a dot of hot glue in the center of your larger bow and nestle the smaller bow inside it.
Flip your bow over and glue your lined alligator clip to the back. Flip back to the front and set aside.
Take your last 6 inch piece of 3/8 ribbon and tie an overhand knot in the center. Make it pretty because this will be the center of your bow. Trim the ends so it will fit in the middle of your bow. Seal the trimmed ends with your lighter.
Take your flower bow and put a dot of hot glue in the center. Put the knot in your knotted ribbon on the glue and hold in place for a few seconds. Tuck the trimmed ends into the loops on the bow to hide them.
That’s it! If you want to mix things up a little, put a rhinestone button, decorated bottle cap, or cute resin in the center instead of the knotted ribbon. Have fun crafting!
This is one of our most popular hair bow tutorials! I just love the simplicity of this hair bow, and how versatile it can be!
]]>
https://www.hairbowsuppliesetc.com/blogs/news/vintage-baby-headband2018-01-27T12:14:00-05:002019-02-19T12:01:54-05:00Vintage Baby Headband TutorialGwen Wichman
I inherited my grandma’s hope chest, and every time I go through it, it brings back so many memories! When I was a little girl, Grandma and I would pull out her wedding dress, her embroidered handkerchiefs, her special lace tablecloth…and she would share the stories that went with them. Today, when I look at look at all that gorgeous satin and lace, I smile…and share the stories with my daughter. I decided to create a vintage baby headband to remind me of the beautiful things in Grandma’s trunk. I smiled when I made it, and I hope you do, too!
Take 2 felt circles, overlap them a little, and glue together. It should look a number 8. Rotate it so the 8 is lying on its side.
Decide on the prettiest arrangement for your 4 flowers and begin gluing them to the felt circle 8. Keep the flowers toward the edges of the felt circles, but still close enough together so you can’t see any felt between them.
Flip your flower cluster over so the felt circles face up. Take your lace elastic and find the shiny side. Turn it shiny side down and glue one end onto one felt circle on the flower cluster. Use the tip of your scissors to press the lace elastic into the glue; this way you won’t burn your fingers.
Loop your elastic around, making sure it’s not twisted, and glue the other end slightly on top of the first end. Press this end down with the scissors tip.
Take your 3rd felt circle and glue it so it covers the lace elastic overlap. Now the back looks nice and finished!
Flip it back to the front, and decide where you want your rhinestone button. I like to nestle it between the flowers, but you can put it wherever it looks prettiest to you. Glue it down. And that’s it, you’re done!
Did you ever imagine a vintage inspired headband would be so easy to make? I like to use ivory flowers and lace, but you can use flowers in any antique shades you like. Mauve, dusty rose, lavender, beige, peach, or mint all look scrumptious on a vintage baby headband!
I feel nostalgia creeping up on me, so I think I’ll pull out my scrapbooks and reminisce about Grandma. Have fun crafting!
]]>
https://www.hairbowsuppliesetc.com/blogs/news/where-to-find-fidget-spinners-we-have-them2017-05-24T06:41:00-04:002017-05-24T06:43:08-04:00Where to find Fidget Spinners? We have them!Gwen Wichman
Remember all the fads our kids have gone through, like Rainbow Looms and bottle flipping? Well, now there’s a new one: Fidget Spinners! And you know what? I like them! That’s why I now have them for sale on www.hairbowsuppliesetc.com in 6 fun colors. They really have cool features in their favor that even teachers would agree on.
1-They are self-contained.
My daughter adored her Rainbow Loom and loved wearing her finished bracelets. However, I would find those tiny, brightly colored loops all over my house for days after she finished a project. A fidget spinner has no loose parts!
2-Kids don’t have to fling them in the air to make them work.
Flipped bottles tend to flip all over. Things get knocked over, people get hit, and feelings get hurt. Also, the tops pop off and then they’re drenched. A fidget spinner spins in their hand making a soothing, whirring sound, keeping the kids busy for hours!
3-Kids can carry on a conversation while they use one.
Kids don’t need to look at a fidget spinner to play with it, so they can actually look at people and talk to them! If you have 2 kids together playing on tablets, it’s silent and all you see are the tops of their heads. Get 2 kids with fidget spinners together, however, and they will compare them, talk about the tricks they can do, and just interact more.
4-Grownups like them, too.
Forbes magazine declared fidget spinners the must have office toy for 2017! They’re a great way to work off nervous energy when you’re in your cubicle. Much easier on your office mates than pencil drumming, tuneless whistling, or finger tapping!
And, finally, my favorite:
5-Science!
Fidget spinners are a fun way to learn about physics. There are videos all over YouTube explaining the principles of how fidget spinners work and suggesting cool experiments. You can record your fidget spinner and look for awesome optical effects when you play the video back.
See, fidget spinners are great! Everyone appreciates something quiet and self-contained when you just need to keep your hands busy.
Get yours at Hairbow Supplies, Etc. today while supplies last!
]]>
https://www.hairbowsuppliesetc.com/blogs/news/how-to-make-a-cheer-bow2017-02-27T12:23:00-05:002019-02-17T15:50:28-05:00How to Make a Cheer BowGwen Wichman
You'll love this cheer bow tutorial! What’s the best way to persuade little sister to cheer for her big brother at his ball games? Make cute DIY cheer bows in his team colors! So I thought I’d talk about how to make a cheer bow step by step. It is easy to learn how to make cheer bows; you can craft bows for your entire cheer squad!
Lay your 3 inch ribbon flat, then fold the ends down at a slight angle so you have 2 loops and 2 tails. Make sure they are even.
Bunch your bow up in the center from top to bottom, then wrap your cable tie around where it is bunched and pull it as tight as you can. Snip the “tail” off the cable tie. This is the back of your bow. Flip your bow over and fluff it a little.
Take one of your bow tails and fold it in half lengthwise. Use your scissors to cut the ribbon at an angle from the tip of the edges toward the fold. Unfold it and you should have a nice V at the end. Seal the cut edge with your lighter. Then follow the same steps for your other bow tail.
Do a simple overhand knot in the center of your 7/8 inch ribbon. Make it pretty, because this will be the center of your cheer bow. Put a dot of glue on the zip tie on the front of your bow, and center the knot in the 7/8 ribbon on it, with one end going up and the other going down. Let the glue set for a few seconds.
Flip your bow to the back, and glue the ponytail holder up against the little nub on the cable tie. Hold the ponytail holder upright until the glue sets.
Pull the bottom end of the 7/8 inch ribbon through the ponytail holder and trim it so it’s just long enough to overlap the ponytail holder and the nub. Glue it down. Do the same with the top end, but have it overlap a little further so it looks neat and pretty. Flip your bow back to the front and give it a final fluff.
There you have it: how to make a cheer bow out of ribbon! I hope you have as much fun with it as my daughter and I have!..
Our next blog is a lot of fun to make! It's the Flower Loop Bow Tutorial. You'll need 3/8 ribbon, scissors, needle and thread. Check out this adorable DIY hair bow tutorial!
]]>
https://www.hairbowsuppliesetc.com/blogs/news/troll-headband-diy2017-02-23T18:18:00-05:002019-02-22T11:43:12-05:00DIY Troll HeadbandGwen Wichman
We're back again to share another fun and easy trolls Poppy headband DIY idea! We bought the video of Trolls and my daughter wanted something to wear that reminded her of the character Poppy. We made this troll hair headband with tulle and it turned out great! I think you will appreciate how simple it is to make a trolls headband.
Gather all the Supplies you need to make a Trolls headband with tulle:
Hot glue gun (If your flower is not self-adhesive)
Put the headband on the table in front of you and fold 1 piece of tulle in half.
Lay the folded tulle over the headband with the loop towards the center and the loose ends pointing out.
Wrap the loose ends of the tulle around the headband and pull up through the loop. Pull the tulle nice and snug against the headband. Repeat with all the other tulle strips, keeping them pushed tightly together. (This helps the “troll hair” be puffier!)
Gather the loose ends of the tulle together, about 6-8 inches above the headband, and tie on the ribbon in a pretty bow. Fluff the tulle a little so it looks like troll hair.
Take your bright blue flower and glue it on just above the headband. Poppy has several flowers in her hair, but we thought 1 still looked super cute!
What a fun trolls headbands to make with your daughter! You can get everything you need for this project from my website. Keep up with the newest products and craft ideas on my website!
This floral crown tutorial is so lovely and super versatile! This crown can be used for a newborn floral crown as a photo prop, or is fully adjustable to be used as a flower girl headband in a wedding!
What you'll need to do is take your crown, and then take your flowers in groups of 2 and then wrap the wire stem around the crown. From the center, you should have 3 groups on the left and 3 groups on the right of flowers. Then you cut your left trim and wrap it around your crown. Lastly take your lace elastic and loop it through the ends of the crown so you are able to tie it. And that's it! Super simple! Watch our video below for more details!
This floral crown is a lovely addition to a bridesmaid or flower girl dress in a wedding. A floral crown headband is so versatile and there are many color combinations that will go perfectly together!
]]>
https://www.hairbowsuppliesetc.com/blogs/news/112860677-how-to-make-an-easter-bunny-hair-bow2016-03-09T11:00:00-05:002019-02-22T12:47:23-05:00How to Make an Easter Bunny Hair BowGwen Wichman
]]>
I saw a sign in a store today counting down the days to Easter. My first thought was, “Woo hoo, spring is almost here! Now I can pull out all my daughter’s cute pastel dresses!” My second thought was, “Oh boy, I need some Easter hair bow ideas!” Then I remembered this adorable Easter Bunny hair bow. It combines the best parts of a traditional bow and a ribbon sculpture. Here’s how you make one.
·Seal the ends of all your ribbons with the lighter.
·Put your 6.5 inch piece of 7/8 polka dot ribbon polka dot side down on your work surface. Find the center of your ribbon and put a vertical line of hot glue down it. Fold both ends in toward the center and place them on your glue line. Hold them in place until your glue sets. This gives you 2 loops.·
··
Flip it over and make 2 accordion pleats in the center, with the 2 folds to the front. Glue the pleats in place with thin lines of hot glue. Hold the center until the glue sets. Fluff the loop ends with your pinkie finger and set this bow aside.
Repeat all the gluing, pleating, and fluffing steps with your 5.5 inch piece of 7/8 inch polka dot ribbon. Now you have 2 bows.
Put a small dot of glue on the front center of the larger bow. Center the smaller bow on the glue dot and hold in place until the glue sets. Set the double bow you just created aside.
Put a 1 inch horizontal line of glue across the center back of your bunny bow. Pinch your alligator clip open and press the back prong into the line of glue. Keep your clip pinched open until the glue cools down and it doesn’t feel tacky when you touch it; this way you won’t glue your clip shut. (I admit it, I have glued clips shut before!) Set the bunny bow aside.
Take your 6 inch piece of 3/8 inch Swiss dot ribbon and tie an overhand knot in the middle. Make it neat and pretty because this will be your bow center.
Flip the bunny bow to the front and put a dot of glue in the middle. Center the knot in your 6 inch piece of ribbon on the glue dot, with one tail going up and the other tail going down. Hold until the glue sets.
Flip your bunny bow to the back, and grab the top tail of the 6 inch piece of ribbon. Pull it between the ears, open your alligator clip, lay the ribbon across the clip, and then close the clip. Trim the ribbon tail so there is about ¼ inch sticking out past the clip. Open the clip, put a dot of glue inside it where the ribbon crossed it, pull the trimmed ribbon back over the glue, and close the clip. You can cut the ribbon a little closer to the clip while the glue sets, if you like. Pull the bottom tail up and trim and glue it the same way.
Now flip your bunny bow back to the front. Re-fluff the bow loops with your pinkie finger and arrange the ears so it looks just right!
That’s it, an Easter bunny hair bow! It’s so simple and looks super cute. You could use all solid ribbons, but I think, for this particular Easter hair accessory, the polka dots make it look extra adorable! I’m going to pull out all my lovely pastel ribbons and make a bunch of them!
Here's another cute video tutorial for you to watch.. The DIY Sailor Hair Bow
]]>
https://www.hairbowsuppliesetc.com/blogs/news/76283781-how-to-make-hair-bows-over-50-free-tutorials2016-02-17T07:00:00-05:002022-06-01T10:33:28-04:00How to Make Hair Bows - Over 50 Free TutorialsGwen Wichman
Here at Hairbow Supplies Etc. we are constantly looking for new and unique ways to add some flair to your daughter’s style through personalized hair accessories and we think one of the best way to do that is by creating your own, one of a kind hair bows to go with any look you desire. Today we are going to talk about how to make a hair bow out of ribbon that can add that finishing touch to any little girl’s look!
This time of year there are just so many fun holidays coming up that can be made even more fun by creating your own DIY hair bows. With Valentine’s Day behind us, we are already looking forward to the next excuse to dress up an everyday look with fun and flashy hair accessories. Imagine how adorable St. Patrick’s Day, Easter, and even your Fourth of July looks can be with a custom made hair bow for your little girl! There are so many ways to create a hair bow, and you can find instructions to make over 50 stunning hair bows by checking out the grosgrain ribbon hair bow tutorials on our website including all the supplies you need to make the hair bows in our shop!
These videos offer step by step instructions to create any style of hair bow, from simple and classic bows to dazzling statement pieces such as the Free to Be Me Hair Bow.
The supplies to make our hair bows are all available in our shop.
With Learning how to make a few hair bows, we have MORE Hair Bows you can Learn How to make and You can Create and Grow Your Hair Bow Business in our How to Make in our Hair Bow Business Course!
When you Learn How to make Hair Bows with our Course, you can Grow Your Business By Making More Hair Bows with our Hair Bow Business Course
for Only $49
You will Learn How to Make Hair Bows, How to Sell at Craft Shows, How to Create Your Own Online Shop through Etsy, How to Create Your Brand, Where to Purchase Your Supplies, Price Your Products, and Market on Social Media
leather sheets (which have really started to be super popular in hair bow making.
And we have all of the tiny things that go with making a hair bow that are little but very necessary including felt circles and nonslip grips
(to keep hair bows in the hair for little girls with thin, wispy hair - that was my little girl for sure! She didn't grow hair long enough for a ponytail until she was at least 3 years old! We had to get all sorts of creative with keeping her hair bows in!)
There is such a variety of tutorials so you can learn not only how to make a boutique hair bow, but how to make a cheerleading hair bow and other functional bows.
Even combine products and include embellishments such as epoxy dot stickers, bottle caps, and buttons in your amazing creations. We have all the ribbon and supplies you need to make tons of lovely hair bows!
Our instructions will show you how to make creating any hair bow easy!
]]>
https://www.hairbowsuppliesetc.com/blogs/news/75601733-baby-shower-headband-station2016-02-04T15:43:00-05:002019-02-22T13:17:35-05:00Baby Shower Headband StationGwen Wichman
This week’s tutorial is how to set up a baby headband making station at your baby shower. This is a super cute and trendy idea to bring a creative touch to your little girl’s shower!
The baby shower headband bar is a memorable addition to any shower, and allows for family and friends to explore their creative side while showing both baby and mom how much they care. Not only will baby have an assortment of adorable headbands upon her arrival, but these baby shower favors are great fun for guests to make as well. These headbands for babies are so simple to put together but make an adorable accessory for any baby girl! You can make the headbands in a variety of sizes using our elastic headband size chart below so baby will have beautiful headbands that she can grow into as she grows up.
To set up a headband station at your baby shower, you will need the following supplies:
The baby shower headband station instructions in the 5 x 7" picture frame is available for download here in our shop.
The headband making station sign called "Make Baby Charlotte a Headband" is available for download here.
First you will need to choose the fold over elastic you would like to use to make your headband. Our 5/8 inch wholesale fold over elastic comes in a variety of colors and prints so you can order your favorites by the yard for the most unique and personalized headbands.
To make the process of choosing your materials simpler, you can purchase our DIY headband making kit here. These kits include an assortment of color coordinated fold over elastic, chiffon flowers, bows, and felt circles to make beautiful matching headbands. We offer headband kits wholesale in a variety of colors and themes, including seasonal themes for Christmas, Halloween, and Valentine’s Day. Each headband kit includes enough materials to make 12 baby headbands.
Next, you will choose an embellishment for your baby headband. Our DIY baby headband kits include an assortment of chiffon flowers and beautiful bows, allowing you to make endless combinations of elegant hair accessories. Choose flowers to match baby’s outfits, or make special holiday themed headbands she can wear all throughout the year.
After you have selected the design for your headband, you will glue the embellishment to your fold over elastic, using the method in the make a baby headband tutorial. To finish your headband, glue on your felt circle. Then use a wooden clothespin to hang your headband on the display!
You can make so many different DIY headbands for both baby and mom to enjoy by including a baby shower headband station at your baby shower. This simple yet creative touch will surely make your baby shower memorable for years to come!
]]>
https://www.hairbowsuppliesetc.com/blogs/news/26936452-simple-baby-hair-clippies2015-05-26T10:25:00-04:002015-05-26T10:25:54-04:00Simple, Baby Hair Clippies!Gwen Wichman
]]>
https://www.hairbowsuppliesetc.com/blogs/news/18553412-alligator-clips-to-the-rescue2015-04-29T11:18:00-04:002015-04-29T11:18:11-04:00Alligator Clips to the Rescue!Gwen WichmanMy kids and I played a board game this weekend, and we lost the piece that keeps the player standing up. A little improvisation and all fixed! Happy children!
]]>
https://www.hairbowsuppliesetc.com/blogs/news/18000452-how-to-make-a-double-loop-hair-bow2015-04-08T17:28:00-04:002019-02-22T13:43:12-05:00How to Make a Double Loop Hair Bow!Gwen Wichman
This week's tutorial is how to make a double loop hair bow! This is a technique that uses a jumbo clip and a needle and thread. This hair bow tutorial makes a 4 inch hair bow. To make a 3 inch hair bow, you would need 10-1/2 inches of 7/8 inch ribbon.
Make sure you have these items when you make your hair bow:
This is an adorable, simple hair bow that would go great in any color or pattern! I'm always a huge fan of making a few white bows for my daughter so they can coordinate with any outfit! Enjoy our video! .
Check out these other great DIY Hair Accessory Projects..
]]>
https://www.hairbowsuppliesetc.com/blogs/news/17961036-new-basic-bows-giveaway-package2015-04-01T10:25:00-04:002015-04-01T10:31:39-04:00NEW Basic Bows Giveaway Package!Gwen Wichman
Today we are giving away an assortment package of our Basic Bows! These are our new hair bows and are featured on our website! We have 4 types of new bows: Glitter Bows, Chiffon Bows, Sequin Bows, and Fabric Bows! One winner will receive an assortment of 12 hair bows!
Giveaway ends Tonight at 8 p.m.! The winner will be announced on our Facebook page: www.facebook.com/HairbowSuppliesEtc
]]>
https://www.hairbowsuppliesetc.com/blogs/news/17903308-simple-no-sew-pinwheel-hair-bow-tutorial2015-03-28T11:42:00-04:002019-02-22T13:57:45-05:00Simple, No-Sew Pinwheel Hair Bow Tutorial!Gwen Wichman
This video is a very simple, no-sew tutorial on how to make a pinwheel hair bow. I love how easy it can be to make hair bows without needle and thread! This hair bow is basically two tuxedo bows hot glued together! I can make this hair bow in about 10 minutes! It's nice to have a quick hair bow to make for my daughter when we need something new for one of her outfits. I make a lot of white hair bows for my daughter as an easy go-to for outfits when I can't find just the right shade of ribbon or flower to match her outfit.
]]>
https://www.hairbowsuppliesetc.com/blogs/news/16921540-how-to-make-an-easter-hair-bow-with-bunny-ears2015-03-04T16:55:00-05:002015-03-04T16:48:16-05:00How to Make an Easter Hair Bow with Bunny EarsGwen Wichman
Lots of exciting things happening at Hairbow Supplies, Etc.! We have a new website as of this week! It is so organized, easy to find products, and a much smoother checkout process! We are so excited to launch our new blog! I thought for the first blog post it would appropriate to do a tutorial! This week I made an Easter Hair Bow with Bunny Ears! My daughter is 5 and has been getting back into wearing hair bows recently, so I thought I'd make her a cute Easter hair bow for school! This bow is a mixture of a tuxedo bow and a sculpture hair bow.
I am so excited about the new things happening at Hairbow Supplies, Etc.! We are expanding our inventory! We have plastic headbands, new colors and sizes of chevron ribbon, and more flowers and embellishments coming in the next couple of weeks! Thank you to all of our customers for your patience during our transition period! We appreciate you continuing to support our family owned and operated business!