
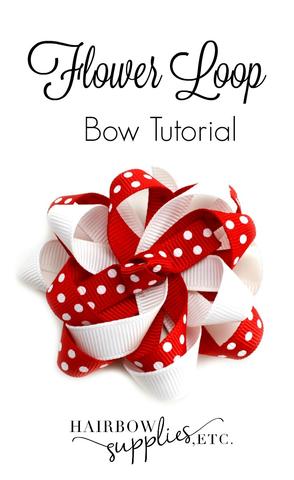
A friend asked me recently which hair bow style is one of my favorites, and I thought of this one, the Flower Loop Hair Bow. You can use ribbons that match your little girl’s favorite outfits, your sports team colors, or holiday colors! Let’s dive in and learn how to make this cute, versatile bow:

- Gather all of your supplies which you could purchase in our store here:
Four pieces of 3/8 inch ribbon, 6 inches long (I use 2 Swiss dot and 2 solid)
Four pieces of 3/8 inch ribbon, 7 inches long
Another 6 inch piece of 3/8 inch ribbon
Needle/Thread (I use Coats and Clark thread)
- Seal the ends of all your ribbons with the lighter. Thread your needle and tie a knot in the end.
- Stack the four six inch ribbons together, with the dots facing up if you are using Swiss dot ribbon. Fold the stack in half, with the dots facing outward. Keep holding them folded. The fold marks the center of your ribbons.
- Push your threaded needle up through the fold on your ribbons, but, do NOT pull it all the way through. Leave the ribbons stacked on the needle and fan them out so they sort of form a star.
- Take the end of one of your ribbons, give it a half turn, and push it onto your needle. It should form a shape like the top of a breast cancer awareness ribbon. Repeat this step with the other ribbon ends, working around in a circle.
- You’ll now have a pretty circle of loops that looks like a flower. Arrange them so they are evenly spaced, then pull your needle and thread all the way through so the knot at the end of your thread is snugged up against the back of your flower bow. Stitch through the center a couple more times to hold the loops in place, and tie off the thread on the back. Cut the thread and set this part of your bow aside.
- Tie a new knot at the end of your thread, then repeat all of the above steps with your 7 inch ribbons.
- Lay the flower bow made from the 7 inch ribbons face up. Decide how you want your bow made from the 6 inch ribbons to sit inside the larger bow. (Once you get the glue on, it won’t move!) Put a dot of hot glue in the center of your larger bow and nestle the smaller bow inside it.
- Flip your bow over and glue your lined alligator clip to the back. Flip back to the front and set aside.
- Take your last 6 inch piece of 3/8 ribbon and tie an overhand knot in the center. Make it pretty because this will be the center of your bow. Trim the ends so it will fit in the middle of your bow. Seal the trimmed ends with your lighter.
- Take your flower bow and put a dot of hot glue in the center. Put the knot in your knotted ribbon on the glue and hold in place for a few seconds. Tuck the trimmed ends into the loops on the bow to hide them.
That’s it! If you want to mix things up a little, put a rhinestone button, decorated bottle cap, or cute resin in the center instead of the knotted ribbon. Have fun crafting!
This is one of our most popular hair bow tutorials! I just love the simplicity of this hair bow, and how versatile it can be!
Check out one of our other super adorable tutorials, the vintage baby headband